驱动开发:内核特征码扫描PE代码段

在笔者上一篇文章《内核特征码搜索函数封装》中为了定位特征的方便我们封装实现了一个可以传入数组实现的SearchSpecialCode定位函数,该定位函数其实还不能算的上简单,本章LyShark将对特征码定位进行简化,让定位变得更简单,并运用定位代码实现扫描内核PE的.text代码段,并从代码段中得到某个特征所在内存位置。

内核特征扫描是指在内核层面对PE文件的代码段进行扫描,检测是否包含特定的指令序列或者特征码。它通常用于防病毒软件、防作弊软件和安全监控等方面。

内核特征扫描的实现一般包括以下几个步骤:

  • 在内核层面获取PE文件的代码段地址和大小。
  • 对代码段进行遍历,获取每个指令的机器码。
  • 比对机器码和预定义的特征码或者指令序列。
  • 如果存在匹配的特征码或指令序列,则进行相应的处理,如通知用户或者禁止执行该代码段。

内核特征扫描需要考虑多种因素,如扫描效率、准确性和对系统性能的影响等。在实际开发中,一般需要针对具体应用场景进行优化。同时,由于扫描的代码段可能包含恶意代码,因此在实现过程中需要考虑安全性。

老样子为了后续教程能够继续,先来定义一个lyshark.h头文件,该头文件中包含了我们本篇文章所必须要使用到的结构体定义,这些定义的函数如果不懂请去看LyShark以前的文章,这里就不罗嗦了。

#include <ntifs.h>
#include <ntimage.h>

typedef struct _KLDR_DATA_TABLE_ENTRY
{
LIST_ENTRY64 InLoadOrderLinks;
ULONG64 __Undefined1;
ULONG64 __Undefined2;
ULONG64 __Undefined3;
ULONG64 NonPagedDebugInfo;
ULONG64 DllBase;
ULONG64 EntryPoint;
ULONG SizeOfImage;
UNICODE_STRING FullDllName;
UNICODE_STRING BaseDllName;
ULONG Flags;
USHORT LoadCount;
USHORT __Undefined5;
ULONG64 __Undefined6;
ULONG CheckSum;
ULONG __padding1;
ULONG TimeDateStamp;
ULONG __padding2;
}KLDR_DATA_TABLE_ENTRY, *PKLDR_DATA_TABLE_ENTRY;

typedef struct _RTL_PROCESS_MODULE_INFORMATION
{
HANDLE Section;
PVOID MappedBase;
PVOID ImageBase;
ULONG ImageSize;
ULONG Flags;
USHORT LoadOrderIndex;
USHORT InitOrderIndex;
USHORT LoadCount;
USHORT OffsetToFileName;
UCHAR FullPathName[256];
} RTL_PROCESS_MODULE_INFORMATION, *PRTL_PROCESS_MODULE_INFORMATION;

typedef struct _RTL_PROCESS_MODULES
{
ULONG NumberOfModules;
RTL_PROCESS_MODULE_INFORMATION Modules[1];
} RTL_PROCESS_MODULES, *PRTL_PROCESS_MODULES;

typedef enum _SYSTEM_INFORMATION_CLASS
{
SystemBasicInformation = 0x0,
SystemProcessorInformation = 0x1,
SystemPerformanceInformation = 0x2,
SystemTimeOfDayInformation = 0x3,
SystemPathInformation = 0x4,
SystemProcessInformation = 0x5,
SystemCallCountInformation = 0x6,
SystemDeviceInformation = 0x7,
SystemProcessorPerformanceInformation = 0x8,
SystemFlagsInformation = 0x9,
SystemCallTimeInformation = 0xa,
SystemModuleInformation = 0xb,
SystemLocksInformation = 0xc,
SystemStackTraceInformation = 0xd,
SystemPagedPoolInformation = 0xe,
SystemNonPagedPoolInformation = 0xf,
SystemHandleInformation = 0x10,
SystemObjectInformation = 0x11,
SystemPageFileInformation = 0x12,
SystemVdmInstemulInformation = 0x13,
SystemVdmBopInformation = 0x14,
SystemFileCacheInformation = 0x15,
SystemPoolTagInformation = 0x16,
SystemInterruptInformation = 0x17,
SystemDpcBehaviorInformation = 0x18,
SystemFullMemoryInformation = 0x19,
SystemLoadGdiDriverInformation = 0x1a,
SystemUnloadGdiDriverInformation = 0x1b,
SystemTimeAdjustmentInformation = 0x1c,
SystemSummaryMemoryInformation = 0x1d,
SystemMirrorMemoryInformation = 0x1e,
SystemPerformanceTraceInformation = 0x1f,
SystemObsolete0 = 0x20,
SystemExceptionInformation = 0x21,
SystemCrashDumpStateInformation = 0x22,
SystemKernelDebuggerInformation = 0x23,
SystemContextSwitchInformation = 0x24,
SystemRegistryQuotaInformation = 0x25,
SystemExtendServiceTableInformation = 0x26,
SystemPrioritySeperation = 0x27,
SystemVerifierAddDriverInformation = 0x28,
SystemVerifierRemoveDriverInformation = 0x29,
SystemProcessorIdleInformation = 0x2a,
SystemLegacyDriverInformation = 0x2b,
SystemCurrentTimeZoneInformation = 0x2c,
SystemLookasideInformation = 0x2d,
SystemTimeSlipNotification = 0x2e,
SystemSessionCreate = 0x2f,
SystemSessionDetach = 0x30,
SystemSessionInformation = 0x31,
SystemRangeStartInformation = 0x32,
SystemVerifierInformation = 0x33,
SystemVerifierThunkExtend = 0x34,
SystemSessionProcessInformation = 0x35,
SystemLoadGdiDriverInSystemSpace = 0x36,
SystemNumaProcessorMap = 0x37,
SystemPrefetcherInformation = 0x38,
SystemExtendedProcessInformation = 0x39,
SystemRecommendedSharedDataAlignment = 0x3a,
SystemComPlusPackage = 0x3b,
SystemNumaAvailableMemory = 0x3c,
SystemProcessorPowerInformation = 0x3d,
SystemEmulationBasicInformation = 0x3e,
SystemEmulationProcessorInformation = 0x3f,
SystemExtendedHandleInformation = 0x40,
SystemLostDelayedWriteInformation = 0x41,
SystemBigPoolInformation = 0x42,
SystemSessionPoolTagInformation = 0x43,
SystemSessionMappedViewInformation = 0x44,
SystemHotpatchInformation = 0x45,
SystemObjectSecurityMode = 0x46,
SystemWatchdogTimerHandler = 0x47,
SystemWatchdogTimerInformation = 0x48,
SystemLogicalProcessorInformation = 0x49,
SystemWow64SharedInformationObsolete = 0x4a,
SystemRegisterFirmwareTableInformationHandler = 0x4b,
SystemFirmwareTableInformation = 0x4c,
SystemModuleInformationEx = 0x4d,
SystemVerifierTriageInformation = 0x4e,
SystemSuperfetchInformation = 0x4f,
SystemMemoryListInformation = 0x50,
SystemFileCacheInformationEx = 0x51,
SystemThreadPriorityClientIdInformation = 0x52,
SystemProcessorIdleCycleTimeInformation = 0x53,
SystemVerifierCancellationInformation = 0x54,
SystemProcessorPowerInformationEx = 0x55,
SystemRefTraceInformation = 0x56,
SystemSpecialPoolInformation = 0x57,
SystemProcessIdInformation = 0x58,
SystemErrorPortInformation = 0x59,
SystemBootEnvironmentInformation = 0x5a,
SystemHypervisorInformation = 0x5b,
SystemVerifierInformationEx = 0x5c,
SystemTimeZoneInformation = 0x5d,
SystemImageFileExecutionOptionsInformation = 0x5e,
SystemCoverageInformation = 0x5f,
SystemPrefetchPatchInformation = 0x60,
SystemVerifierFaultsInformation = 0x61,
SystemSystemPartitionInformation = 0x62,
SystemSystemDiskInformation = 0x63,
SystemProcessorPerformanceDistribution = 0x64,
SystemNumaProximityNodeInformation = 0x65,
SystemDynamicTimeZoneInformation = 0x66,
SystemCodeIntegrityInformation = 0x67,
SystemProcessorMicrocodeUpdateInformation = 0x68,
SystemProcessorBrandString = 0x69,
SystemVirtualAddressInformation = 0x6a,
SystemLogicalProcessorAndGroupInformation = 0x6b,
SystemProcessorCycleTimeInformation = 0x6c,
SystemStoreInformation = 0x6d,
SystemRegistryAppendString = 0x6e,
SystemAitSamplingValue = 0x6f,
SystemVhdBootInformation = 0x70,
SystemCpuQuotaInformation = 0x71,
SystemNativeBasicInformation = 0x72,
SystemErrorPortTimeouts = 0x73,
SystemLowPriorityIoInformation = 0x74,
SystemBootEntropyInformation = 0x75,
SystemVerifierCountersInformation = 0x76,
SystemPagedPoolInformationEx = 0x77,
SystemSystemPtesInformationEx = 0x78,
SystemNodeDistanceInformation = 0x79,
SystemAcpiAuditInformation = 0x7a,
SystemBasicPerformanceInformation = 0x7b,
SystemQueryPerformanceCounterInformation = 0x7c,
SystemSessionBigPoolInformation = 0x7d,
SystemBootGraphicsInformation = 0x7e,
SystemScrubPhysicalMemoryInformation = 0x7f,
SystemBadPageInformation = 0x80,
SystemProcessorProfileControlArea = 0x81,
SystemCombinePhysicalMemoryInformation = 0x82,
SystemEntropyInterruptTimingInformation = 0x83,
SystemConsoleInformation = 0x84,
SystemPlatformBinaryInformation = 0x85,
SystemThrottleNotificationInformation = 0x86,
SystemHypervisorProcessorCountInformation = 0x87,
SystemDeviceDataInformation = 0x88,
SystemDeviceDataEnumerationInformation = 0x89,
SystemMemoryTopologyInformation = 0x8a,
SystemMemoryChannelInformation = 0x8b,
SystemBootLogoInformation = 0x8c,
SystemProcessorPerformanceInformationEx = 0x8d,
SystemSpare0 = 0x8e,
SystemSecureBootPolicyInformation = 0x8f,
SystemPageFileInformationEx = 0x90,
SystemSecureBootInformation = 0x91,
SystemEntropyInterruptTimingRawInformation = 0x92,
SystemPortableWorkspaceEfiLauncherInformation = 0x93,
SystemFullProcessInformation = 0x94,
SystemKernelDebuggerInformationEx = 0x95,
SystemBootMetadataInformation = 0x96,
SystemSoftRebootInformation = 0x97,
SystemElamCertificateInformation = 0x98,
SystemOfflineDumpConfigInformation = 0x99,
SystemProcessorFeaturesInformation = 0x9a,
SystemRegistryReconciliationInformation = 0x9b,
MaxSystemInfoClass = 0x9c,
} SYSTEM_INFORMATION_CLASS;

// 声明函数
NTSYSAPI PIMAGE_NT_HEADERS NTAPI RtlImageNtHeader(_In_ PVOID Base);
NTSTATUS NTAPI ZwQuerySystemInformation(SYSTEM_INFORMATION_CLASS SystemInformationClass, PVOID SystemInformation, ULONG SystemInformationLength, PULONG ReturnLength);

typedef VOID(__cdecl *PMiProcessLoaderEntry)(PKLDR_DATA_TABLE_ENTRY section, IN LOGICAL Insert);
typedef NTSTATUS(*NTQUERYSYSTEMINFORMATION)(IN ULONG SystemInformationClass, OUT PVOID SystemInformation, IN ULONG_PTR SystemInformationLength, OUT PULONG_PTR ReturnLength OPTIONAL);

我们继续,首先实现特征码字符串的解析与扫描实现此处UtilLySharkSearchPattern函数就是LyShark封装过的,这里依次介绍一下参数传递的含义。

  • pattern 用于传入一段字符串特征值(以\x开头)
  • len 代表输入特征码长度(除去\x后的长度)
  • base 代表扫描内存的基地址
  • size 代表需要向下扫描的长度
  • ppFound 代表扫描到首地址以后返回的内存地址

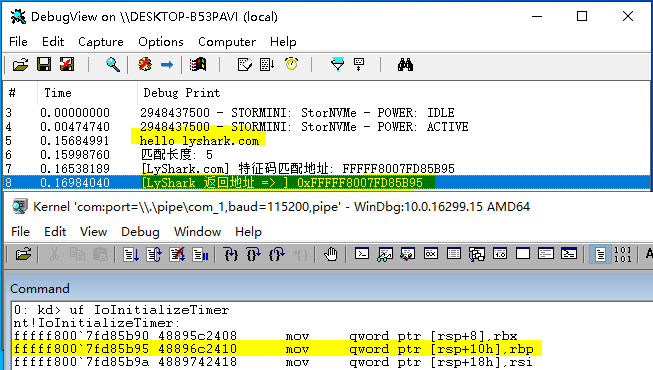
这段代码该如何使用,如下我们以定位IoInitializeTimer为例,演示UtilLySharkSearchPattern如何定位特征的,如下代码pattern变量中就是我们需要定位的特征值,pattern_size则是需要定位的特征码长度,在address地址位置向下扫描128字节,找到则返回到find_address变量内。

#include "lyshark.h"

PVOID GetIoInitializeTimerAddress()
{
PVOID VariableAddress = 0;
UNICODE_STRING uioiTime = { 0 };

RtlInitUnicodeString(&uioiTime, L"IoInitializeTimer");
VariableAddress = (PVOID)MmGetSystemRoutineAddress(&uioiTime);
if (VariableAddress != 0)
{
return VariableAddress;
}
return 0;
}

// 对指定内存执行特征码扫描
NTSTATUS UtilLySharkSearchPattern(IN PUCHAR pattern, IN ULONG_PTR len, IN const VOID* base, IN ULONG_PTR size, OUT PVOID* ppFound)
{
// 计算匹配长度
// 特征码扫描
NT_ASSERT(ppFound != 0 && pattern != 0 && base != 0);
if (ppFound == 0 || pattern == 0 || base == 0)
{
return STATUS_INVALID_PARAMETER;
}

__try
{
for (ULONG_PTR i = 0; i < size - len; i++)
{
BOOLEAN found = TRUE;
for (ULONG_PTR j = 0; j < len; j++)
{
if (pattern[j] != ((PUCHAR)base)[i + j])
{
found = FALSE;
break;
}
}

if (found != FALSE)
{
*ppFound = (PUCHAR)base + i;
DbgPrint("[LyShark.com] 特征码匹配地址: %p \n", (PUCHAR)base + i);
return STATUS_SUCCESS;
}
}
}
__except (EXCEPTION_EXECUTE_HANDLER)
{
return STATUS_UNHANDLED_EXCEPTION;
}

return STATUS_NOT_FOUND;
}

VOID UnDriver(PDRIVER_OBJECT driver)
{
DbgPrint(("Uninstall Driver Is OK \n"));
}

NTSTATUS DriverEntry(IN PDRIVER_OBJECT Driver, PUNICODE_STRING RegistryPath)
{
DbgPrint(("hello lyshark.com \n"));

// 返回匹配长度5
CHAR pattern[] = "\x48\x89\x6c\x24\x10";
PVOID *find_address = NULL;

int pattern_size = sizeof(pattern) - 1;
DbgPrint("匹配长度: %d \n", pattern_size);

// 得到基地址
PVOID address = GetIoInitializeTimerAddress();

// 扫描特征
NTSTATUS nt = UtilLySharkSearchPattern((PUCHAR)pattern, pattern_size, address, 128, &find_address);

DbgPrint("[LyShark 返回地址 => ] 0x%p \n", (ULONG64)find_address);

Driver->DriverUnload = UnDriver;
return STATUS_SUCCESS;
}

运行驱动程序完成特征定位,并对比定位效果。

如上述所示定位函数我们已经封装好了,相信你也能感受到这种方式要比使用数组更方便,为了能定位到内核PE结构我们需要使用RtlImageNtHeader来解析,这个内核函数专门用来得到内核程序的PE头部结构的,在下方案例中首先我们使用封装过的LySharkToolsUtilKernelBase函数拿到内核基址,如果你不懂函数实现细节请阅读《内核取ntoskrnl模块基地址》这篇文章,拿到基址以后可以直接使用RtlImageNtHeader对其PE头部进行解析,如下所示。

#include "lyshark.h"

// 定义全局变量
static PVOID g_KernelBase = 0;
static ULONG g_KernelSize = 0;

// 得到KernelBase基地址
PVOID LySharkToolsUtilKernelBase(OUT PULONG pSize)
{
NTSTATUS status = STATUS_SUCCESS;
ULONG bytes = 0;
PRTL_PROCESS_MODULES pMods = 0;
PVOID checkPtr = 0;
UNICODE_STRING routineName;

if (g_KernelBase != 0)
{
if (pSize)
{
*pSize = g_KernelSize;
}
return g_KernelBase;
}

RtlInitUnicodeString(&routineName, L"NtOpenFile");

checkPtr = MmGetSystemRoutineAddress(&routineName);
if (checkPtr == 0)
return 0;

__try
{
status = ZwQuerySystemInformation(SystemModuleInformation, 0, bytes, &bytes);
if (bytes == 0)
{
return 0;
}

pMods = (PRTL_PROCESS_MODULES)ExAllocatePoolWithTag(NonPagedPoolNx, bytes, L"LyShark");
RtlZeroMemory(pMods, bytes);

status = ZwQuerySystemInformation(SystemModuleInformation, pMods, bytes, &bytes);

if (NT_SUCCESS(status))
{
PRTL_PROCESS_MODULE_INFORMATION pMod = pMods->Modules;

for (ULONG i = 0; i < pMods->NumberOfModules; i++)
{
if (checkPtr >= pMod[i].ImageBase && checkPtr < (PVOID)((PUCHAR)pMod[i].ImageBase + pMod[i].ImageSize))
{
g_KernelBase = pMod[i].ImageBase;
g_KernelSize = pMod[i].ImageSize;
if (pSize)
{
*pSize = g_KernelSize;
}
break;
}
}
}
}
__except (EXCEPTION_EXECUTE_HANDLER)
{
return 0;
}

if (pMods)
{
ExFreePoolWithTag(pMods, L"LyShark");
}

DbgPrint("KernelBase = > %p \n", g_KernelBase);
return g_KernelBase;
}

VOID UnDriver(PDRIVER_OBJECT driver)
{
DbgPrint(("Uninstall Driver Is OK \n"));
}

NTSTATUS DriverEntry(IN PDRIVER_OBJECT Driver, PUNICODE_STRING RegistryPath)
{
DbgPrint(("hello lyshark.com \n"));

// 获取内核第一个模块的基地址
PVOID base = LySharkToolsUtilKernelBase(0);
if (!base)
return STATUS_NOT_FOUND;

// 得到NT头部PE32+结构
PIMAGE_NT_HEADERS64 pHdr = RtlImageNtHeader(base);
if (!pHdr)
return STATUS_INVALID_IMAGE_FORMAT;

// 首先寻找代码段
PIMAGE_SECTION_HEADER pFirstSection = (PIMAGE_SECTION_HEADER)(pHdr + 1);
for (PIMAGE_SECTION_HEADER pSection = pFirstSection; pSection < pFirstSection + pHdr->FileHeader.NumberOfSections; pSection++)
{
ANSI_STRING LySharkSection, LySharkName;
RtlInitAnsiString(&LySharkSection, ".text");
RtlInitAnsiString(&LySharkName, (PCCHAR)pSection->Name);

DbgPrint("[LyShark.PE] 名字: %Z | 地址: %p | 长度: %d \n", LySharkName, (PUCHAR)base + pSection->VirtualAddress, pSection->Misc.VirtualSize);
}

Driver->DriverUnload = UnDriver;
return STATUS_SUCCESS;
}

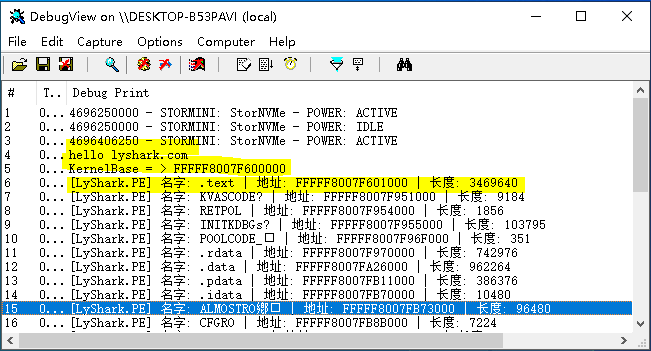
运行这段驱动程序,你会得到当前内核所有PE节信息,枚举效果如下所示。

既然能够得到PE头部数据了,那么我们只需要扫描这段空间并得到匹配到的数据即可,其实很容易实现,如下代码所示。

#include "lyshark.h"

// 定义全局变量
static PVOID g_KernelBase = 0;
static ULONG g_KernelSize = 0;

// 得到KernelBase基地址
PVOID LySharkToolsUtilKernelBase(OUT PULONG pSize)
{
NTSTATUS status = STATUS_SUCCESS;
ULONG bytes = 0;
PRTL_PROCESS_MODULES pMods = 0;
PVOID checkPtr = 0;
UNICODE_STRING routineName;

if (g_KernelBase != 0)
{
if (pSize)
{
*pSize = g_KernelSize;
}
return g_KernelBase;
}

RtlInitUnicodeString(&routineName, L"NtOpenFile");

checkPtr = MmGetSystemRoutineAddress(&routineName);
if (checkPtr == 0)
return 0;

__try
{
status = ZwQuerySystemInformation(SystemModuleInformation, 0, bytes, &bytes);
if (bytes == 0)
{
return 0;
}

pMods = (PRTL_PROCESS_MODULES)ExAllocatePoolWithTag(NonPagedPoolNx, bytes, L"LyShark");
RtlZeroMemory(pMods, bytes);

status = ZwQuerySystemInformation(SystemModuleInformation, pMods, bytes, &bytes);

if (NT_SUCCESS(status))
{
PRTL_PROCESS_MODULE_INFORMATION pMod = pMods->Modules;

for (ULONG i = 0; i < pMods->NumberOfModules; i++)
{
if (checkPtr >= pMod[i].ImageBase && checkPtr < (PVOID)((PUCHAR)pMod[i].ImageBase + pMod[i].ImageSize))
{
g_KernelBase = pMod[i].ImageBase;
g_KernelSize = pMod[i].ImageSize;
if (pSize)
{
*pSize = g_KernelSize;
}
break;
}
}
}
}
__except (EXCEPTION_EXECUTE_HANDLER)
{
return 0;
}

if (pMods)
{
ExFreePoolWithTag(pMods, L"LyShark");
}

DbgPrint("KernelBase = > %p \n", g_KernelBase);
return g_KernelBase;
}

// 对指定内存执行特征码扫描
NTSTATUS UtilLySharkSearchPattern(IN PUCHAR pattern, IN UCHAR wildcard, IN ULONG_PTR len, IN const VOID* base, IN ULONG_PTR size, OUT PVOID* ppFound)
{
NT_ASSERT(ppFound != 0 && pattern != 0 && base != 0);
if (ppFound == 0 || pattern == 0 || base == 0)
{
return STATUS_INVALID_PARAMETER;
}

__try
{
for (ULONG_PTR i = 0; i < size - len; i++)
{
BOOLEAN found = TRUE;
for (ULONG_PTR j = 0; j < len; j++)
{
if (pattern[j] != wildcard && pattern[j] != ((PUCHAR)base)[i + j])
{
found = FALSE;
break;
}
}

if (found != FALSE)
{
*ppFound = (PUCHAR)base + i;
DbgPrint("[LyShark] 特征码匹配地址: %p \n", (PUCHAR)base + i);
return STATUS_SUCCESS;
}
}
}
__except (EXCEPTION_EXECUTE_HANDLER)
{
return STATUS_UNHANDLED_EXCEPTION;
}

return STATUS_NOT_FOUND;
}

// 扫描代码段中的指令片段
NTSTATUS ByLySharkComUtilScanSection(IN PCCHAR section, IN PUCHAR pattern, IN UCHAR wildcard, IN ULONG_PTR len, OUT PVOID* ppFound)
{
NT_ASSERT(ppFound != 0);
if (ppFound == 0)
return STATUS_INVALID_PARAMETER;

// 获取内核第一个模块的基地址
PVOID base = LySharkToolsUtilKernelBase(0);
if (!base)
return STATUS_NOT_FOUND;

// 得到NT头部PE32+结构
PIMAGE_NT_HEADERS64 pHdr = RtlImageNtHeader(base);
if (!pHdr)
return STATUS_INVALID_IMAGE_FORMAT;

// 首先寻找代码段
PIMAGE_SECTION_HEADER pFirstSection = (PIMAGE_SECTION_HEADER)(pHdr + 1);
for (PIMAGE_SECTION_HEADER pSection = pFirstSection; pSection < pFirstSection + pHdr->FileHeader.NumberOfSections; pSection++)
{
ANSI_STRING LySharkSection, LySharkText;
RtlInitAnsiString(&LySharkSection, section);
RtlInitAnsiString(&LySharkText, (PCCHAR)pSection->Name);

// 判断是不是我们要找的.text节
if (RtlCompareString(&LySharkSection, &LySharkText, TRUE) == 0)
{
// 如果是则开始匹配特征码
return UtilLySharkSearchPattern(pattern, wildcard, len, (PUCHAR)base + pSection->VirtualAddress, pSection->Misc.VirtualSize, ppFound);
}
}

return STATUS_NOT_FOUND;
}

VOID UnDriver(PDRIVER_OBJECT driver)
{
DbgPrint(("Uninstall Driver Is OK \n"));
}

NTSTATUS DriverEntry(IN PDRIVER_OBJECT Driver, PUNICODE_STRING RegistryPath)
{
DbgPrint("hello lyshark.com \n");

PMiProcessLoaderEntry m_MiProcessLoaderEntry = NULL;
RTL_OSVERSIONINFOW Version = { 0 };

Version.dwOSVersionInfoSize = sizeof(Version);
RtlGetVersion(&Version);

//获取内核版本号
DbgPrint("主版本: %d -->次版本: %d --> 编译版本: %d", Version.dwMajorVersion, Version.dwMinorVersion, Version.dwBuildNumber);

if (Version.dwMajorVersion == 10)
{
// 如果是 win10 18363 则匹配特征
if (Version.dwBuildNumber == 18363)
{
CHAR pattern[] = "\x48\x89\x5c\x24\x08";
int pattern_size = sizeof(pattern) - 1;

ByLySharkComUtilScanSection(".text", (PUCHAR)pattern, 0xCC, pattern_size, (PVOID *)&m_MiProcessLoaderEntry);
DbgPrint("[LyShark] 输出首地址: %p", m_MiProcessLoaderEntry);
}
}

Driver->DriverUnload = UnDriver;
return STATUS_SUCCESS;
}

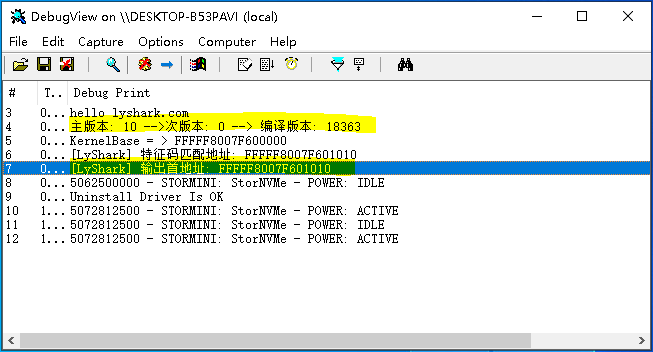
代码中首先判断系统主版本windows 10 18363如果是则执行匹配,只匹配.text也就是代码段中的数据,当遇到0xcc时则取消继续,否则继续执行枚举,程序输出效果如下所示。

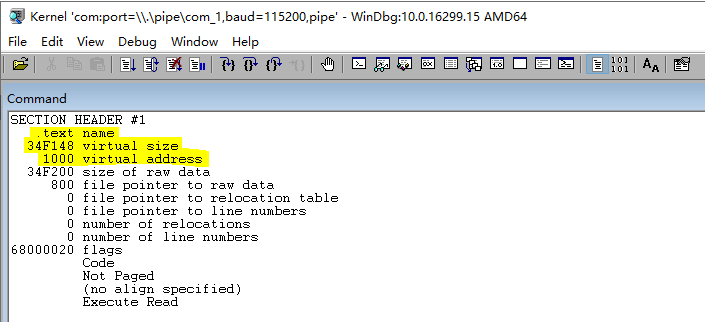
在WinDBG中输入命令!dh 0xfffff8007f600000解析出内核PE头数据,可以看到如下所示,对比无误。